Welcome to the first (but hopefully not the last) instalment of Fruity Candy – a tutorial series on FL Studio.

Preface
I’ll start by sharing my motivation behind doing this: FL Studio has become such an integral part of my music making process, and in the process of using it for 8+ years I’ve gotten to know it inside and out. I’d like to share some of this acquired knowledge with the online community in the hopes that it will save somebody a bit of time, help them develop a more efficient workflow, inspire them, whatever.
What is a pattern?
I think part of the reason FL Studio has become so key to my process is because of its support for patterns. I started off writing music with computers around the time of trackers – Scream Tracker, Impulse Tracker, etc. These early music creation tools were all about patterns, actually, so much so that you had to enter note and automation data manually, step by step.

After using them for several years I made the switch to FL Studio, and while there was a bit of a learning curve with regards to how automation worked, the pattern-based approach was pretty much exactly what I was used to, but with lots of welcomed additions (virtual instruments, effects, piano roll!)
If you’ve used FL Studio, a tracker, or even a drum machine before, you probably have a pretty good idea of what a pattern is. In the context of music making it’s basically a series of data (typically note or automation data) that can be looped, or in this case, used a building block to create something bigger.
So why should you care about patterns? In a word: time.
A practical example
The biggest thing I’ve found with patterns is that they save a huge amount of time. Let’s say you’ve got a 1 bar loop that you want to repeat for 4 bars. In FL Studio you would simply program the beat once and “draw” the pattern 4 times on your pattern playlist.


With a conventional sequencer you would have to copy/paste this 1 bar loop 4 times. Each copy/paste would result in a new unique copy of that loop. If you decided you want to add an extra ghost snare to your beat you’d need to go into each copy and add it manually.
N.B.: some sequencers do offer a concept similar to patterns:
- In Cubase you can create “shared” copies by holding ALT + SHIFT and dragging a part
- In Ableton Live: if you “stretch” a clip in arrangement view it will automatically loop, however, if you cut the clip to insert a fill/variation you will end up with two unique non-shared clips. Blast!
Where patterns really shine is as you start to lay out your main sequence. To expand on the above example, in addition to your beat you may also have a bass line and some pad hits that you want to repeat. Easy: make 3 patterns and draw them on the playlist the desired number of times.

That’s good and all, but pretty boring. It needs some variation. Let’s create a copy of each pattern that does something a bit different – some filter automation on the bass, a fill on the beat and a variation for the pad hits At this point you need to make a decision about how you want to lay things out: as pattern clips or pattern blocks.
Pattern clips vs. pattern clips
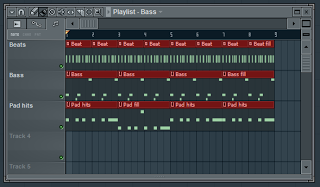
Personally I’m a creature of habit and have gotten used to laying things out with pattern blocks (pattern clips didn’t exist in earlier versions of FL Studio). With this approach it’s very important that you keep related patterns together or you will end up with a nightmarish playlist. It also helps to name them well, colour them, etc. so you can remember what they are:

The main drawback with the pattern block playlist is that each row is tied to a specific pattern, as you can see above. Pattern clips, on the other hand, can be placed anywhere within the clip arrangement, often resulting in a much cleaner layout. Here’s the same thing laid out with clips:

The important thing to note here is that a pattern clip and a pattern block are the exact same thing. They reference the same pattern, it’s just a matter of how you choose to lay them out. There’s no reason you can’t use both together and I often do. For example, I will put my automation clips up top as this gives me the ability to edit the automation directly from the playlist:

In closing
I hope this article has shed a bit of light on patterns in FL Studio and how to use them. Here’s a zipped loop package (FL Studio 9) that shows these concepts in action. For illustrative purposes I’ve laid out the same thing both as pattern blocks and pattern clips.
Till next time…


