Fruity Candy episode 2: drum programming tricks

AudioPlayer.setup(“http://snugsound.com/blog/player/player.swf”, {
width: 290
});

So I flip-flopped on the format for the second instalment of Fruity Candy. I contemplated doing a screencast, but then realized that I generally don’t like to listening to the sound of my own voice, and the prospect of trying to record several minutes of it would likely result in me ripping out my hair. So for now it’ll just be another article, the topic of which is drum programming tricks.

I’m sure there are dozens if not hundreds of tutorials out there on this topic, but what I hope will set this one apart is some of the personal techniques I’ve developed. Most of what I cover here will apply to pretty much any DAW/sequencer, but the actual implementation will of course be specific to FL Studio (9).

Preface
This article assumes you’re working directly with drum samples, sampled from records, drums machines, etc. If you’re working with a drum plugin, like the excellent Addictive Drums, then many of these techniques won’t apply. Similarly, if you’re working with multi-sampled drum hits from a real kit then some of the techniques will be less relevant.

Dynamics/movement

One of the most important techniques of programming electronic beats is creating good dynamics/movement. A lot of this comes from hihat programming and ghost notes. I’ll start with the former.

A steady stream of 16th note hihats sounds more like a broken machine gun than a component of a drum beat. There’s no movement or dynamics at all:

Get Flash

AudioPlayer.embed(“audioplayer_1”, {soundFile: “http://snugsound.com/blog/fruity-candy-2/01%20Hats%20-%2016ths.mp3”, noinfo: “yes”});

So the first thing you want to do is program some variation, starting with velocity:

Get Flash

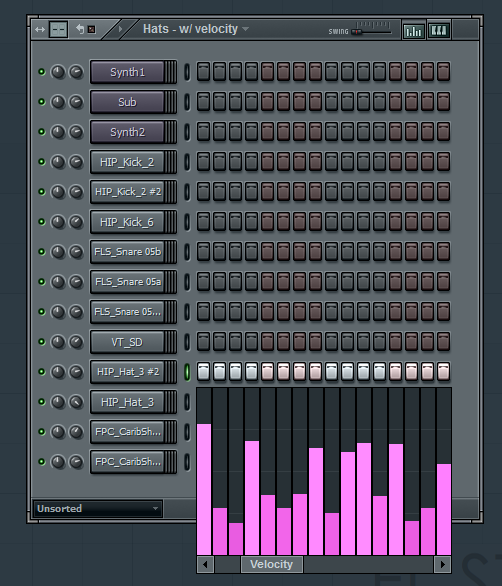
AudioPlayer.embed(“audioplayer_2”, {soundFile: “http://snugsound.com/blog/fruity-candy-2/02%20Hats%20-%20w%20velocity.mp3”, noinfo: “yes”});

Now, think about what happens when you hit a real hihat more softly – it’s a little more muted, a little less punchy. We can approximate something like this with a lowpass filter:

Get Flash

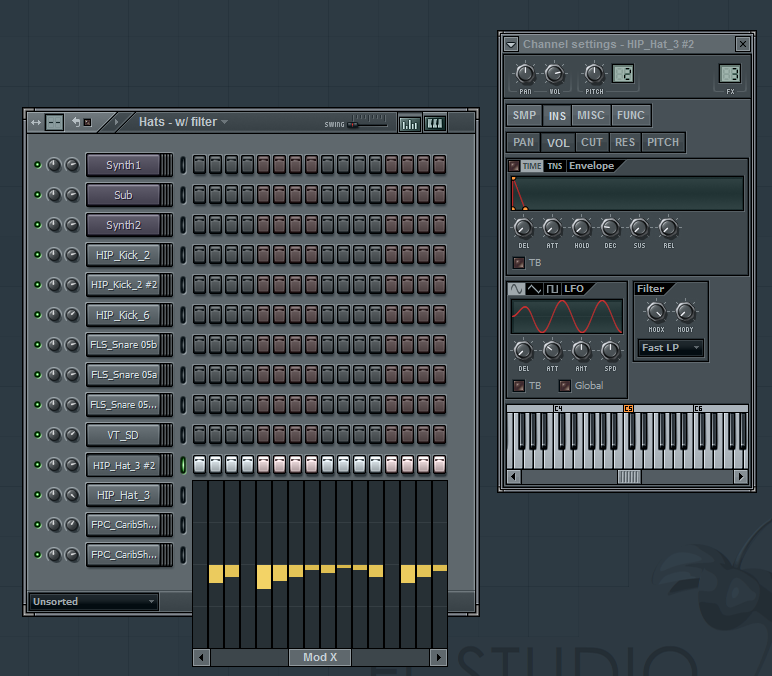
AudioPlayer.embed(“audioplayer_3”, {soundFile: “http://snugsound.com/blog/fruity-candy-2/03%20Hats%20-%20w%20filter.mp3”, noinfo: “yes”});

Also, a real hi-hat will decay more quickly when you hit it softly. We can replicate this by copying the first hihat channel and adjusting the decay of the volume envelope. We’ll use the original channel for the harder hits, and the new one for softer hits:

Get Flash

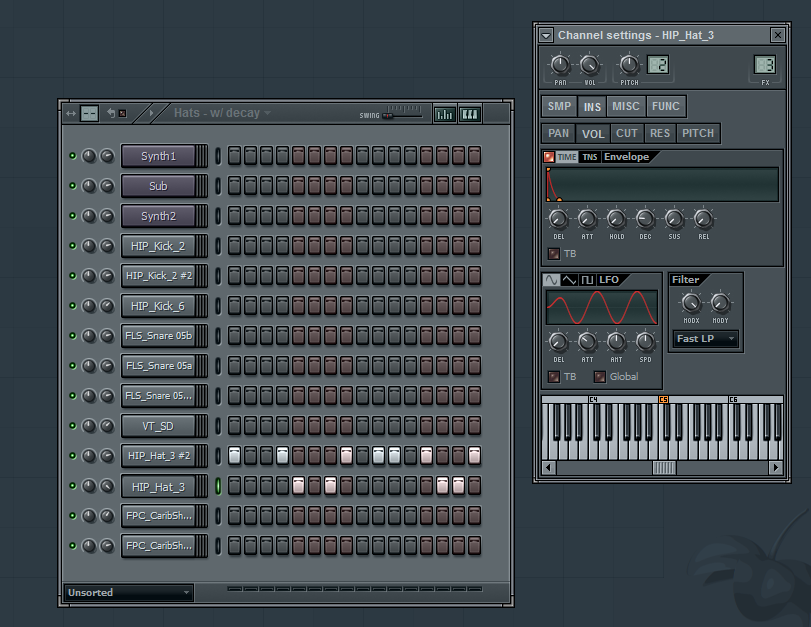
AudioPlayer.embed(“audioplayer_4”, {soundFile: “http://snugsound.com/blog/fruity-candy-2/04%20Hats%20-%20w%20decay.mp3”, noinfo: “yes”});

I’ve also removed a few notes to create a bit more push/pull.

Building kicks

The big kicks you hear in electronic music are usually the result of stacking/layering 2 or more kick samples. So for example, using the low-end from one and the punch from another.

Let’s start with a simple, boomy kick. As you can see it doesn’t have a whole lot of high-end to it:

Get Flash

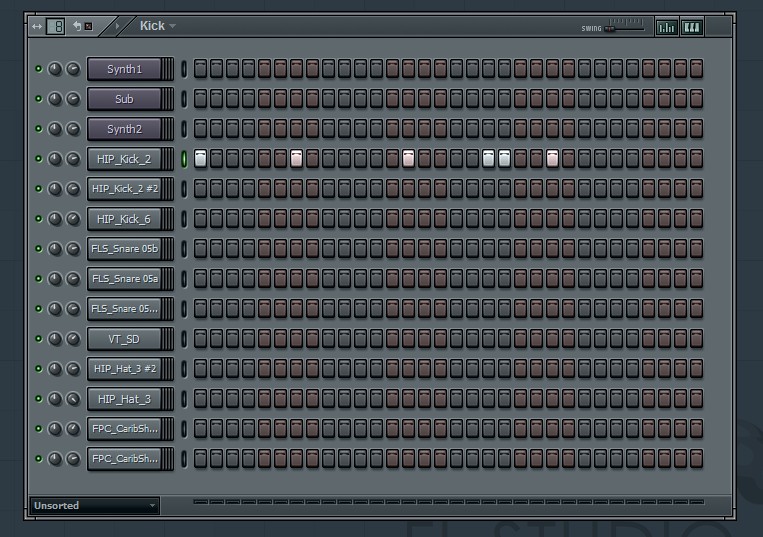
AudioPlayer.embed(“audioplayer_5”, {soundFile: “http://snugsound.com/blog/fruity-candy-2/05%20Kick.mp3”, noinfo: “yes”});

I’m going to layer a second kick with more high-end on top, but first I’ll use a lowpass filter to remove what little high-end the first one has. I’ll also increase the attack of the volume envelope to remove the initial transients (you’ll see why in a second):

Get Flash

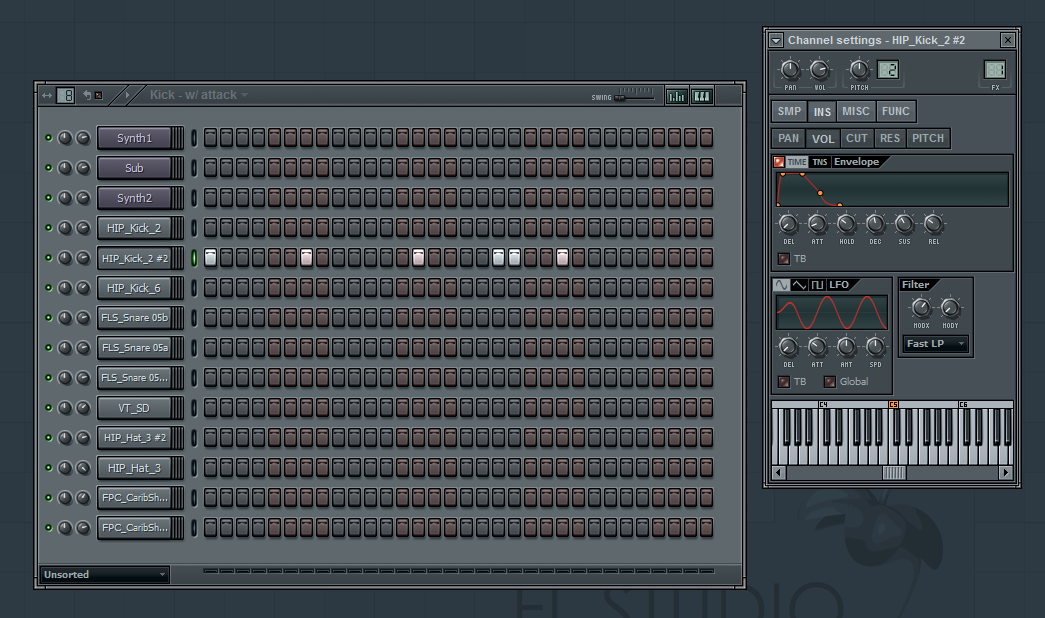
AudioPlayer.embed(“audioplayer_6”, {soundFile: “http://snugsound.com/blog/fruity-candy-2/06%20Kick%20-%20w%20attack.mp3”, noinfo: “yes”});

Now, I’ll layer my 2nd kick and adjust the decay so we only get the attack portion of it

Get Flash

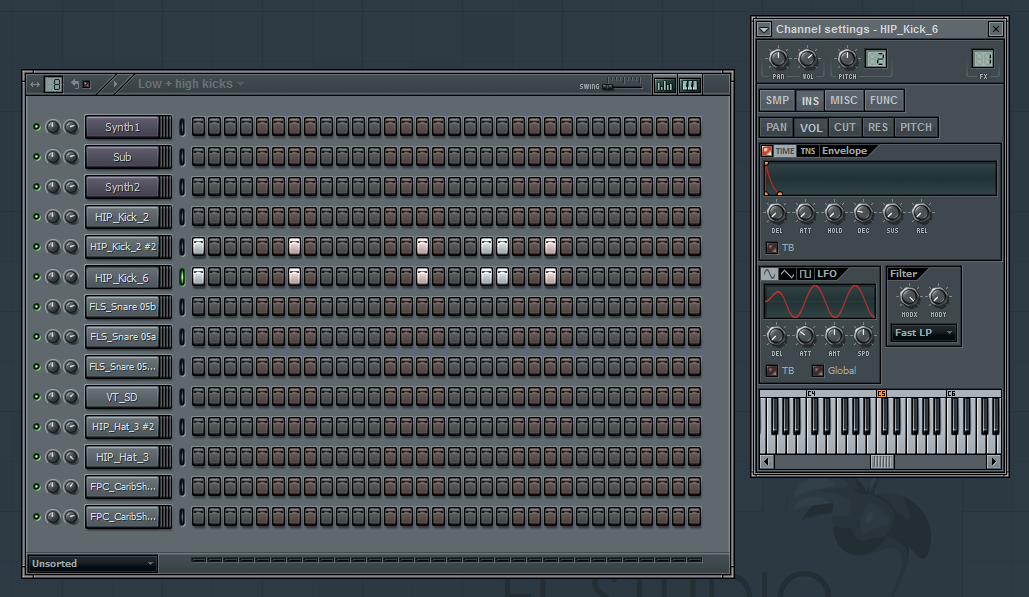
AudioPlayer.embed(“audioplayer_7”, {soundFile: “http://snugsound.com/blog/fruity-candy-2/07%20Low%20+%20high%20kicks.mp3”, noinfo: “yes”});

Basically, what I’ve done here is “cross-fade” between the two kicks using the volume envelopes.

Building snares

The same approach can be applied for snares, although in this case I just layer two of them outright and adjust the envelopes a bit to make them sound as if they’re gated. This helps to create more impact:

Get Flash

AudioPlayer.embed(“audioplayer_8”, {soundFile: “http://snugsound.com/blog/fruity-candy-2/08%20Snare.mp3”, noinfo: “yes”});

Ghost snares

I’ve picked a complimentary snare, set a relatively short decay and applied the same concepts as I did to my hihats to create some movement:

Get Flash

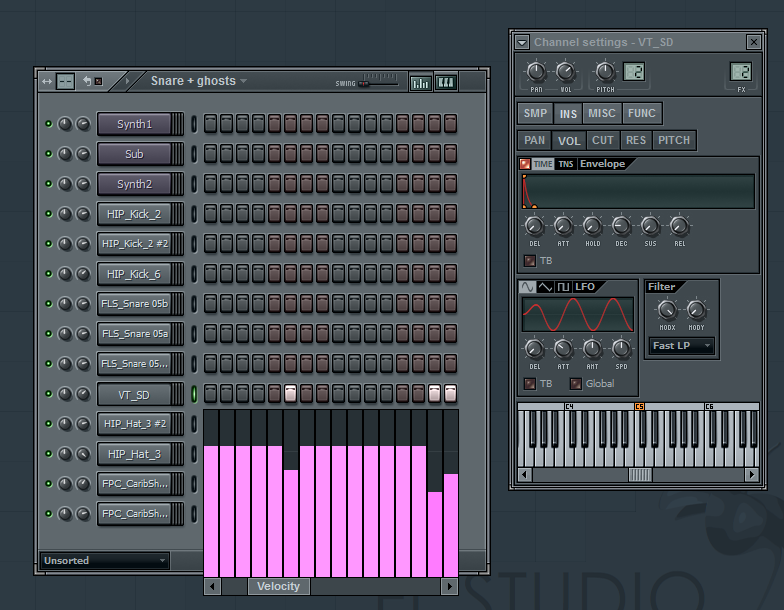
AudioPlayer.embed(“audioplayer_9”, {soundFile: “http://snugsound.com/blog/fruity-candy-2/09%20Snare%20+%20ghosts.mp3”, noinfo: “yes”});

Looping

Try looping your samples to create some interesting rhythms. Here I’ve taken a shaker and used a cross-fading loop to make it sound as if somebody’s shaking it a couple times:

Get Flash

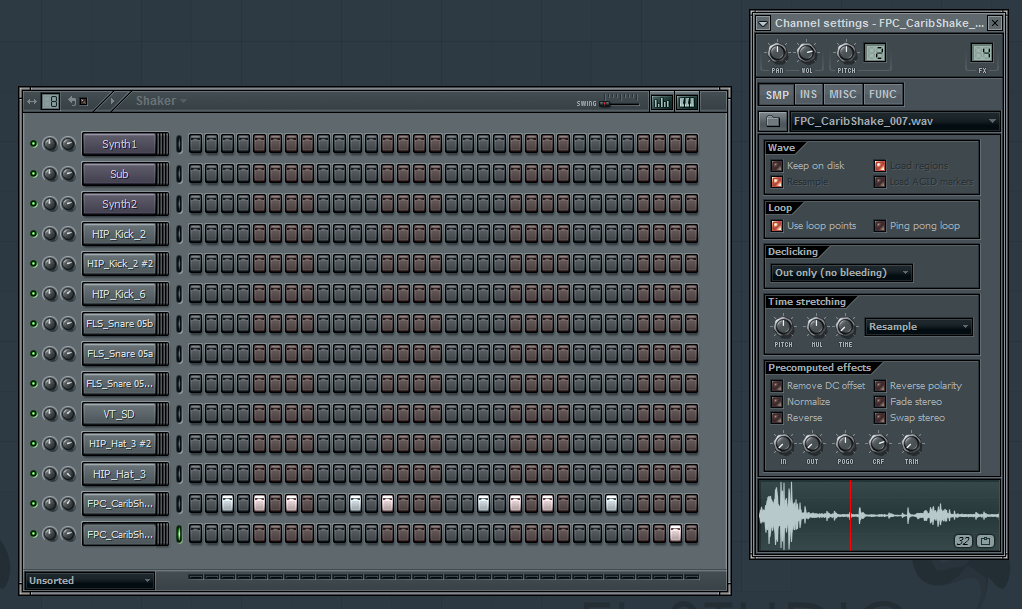
AudioPlayer.embed(“audioplayer_10”, {soundFile: “http://snugsound.com/blog/fruity-candy-2/10%20Shaker.mp3”, noinfo: “yes”});

Reversing and time-stretching

You can also achieve some interesting effects through reversing and stretching samples. For example, I’ve taken one of the snares, timestretched it a bit and reversed it (I did a few other things with it, see if you can pick them out):

Get Flash

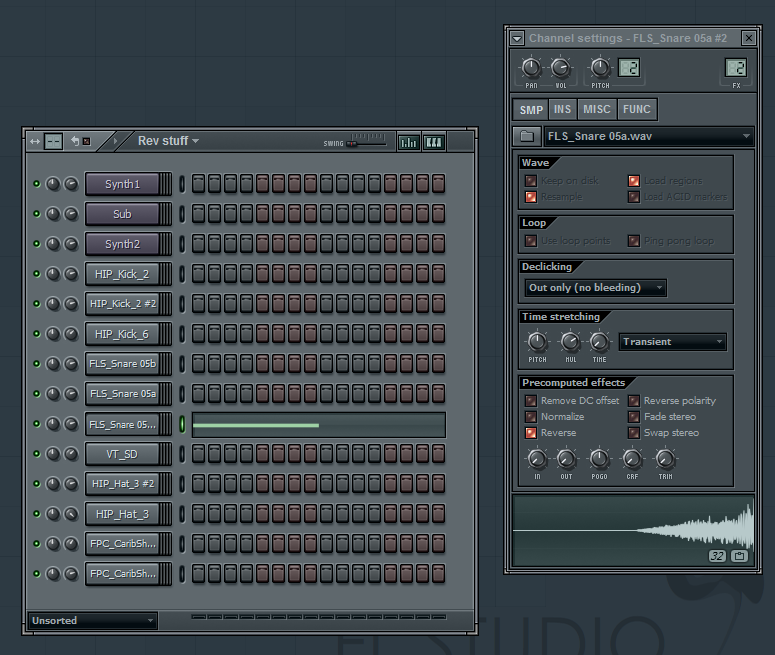
AudioPlayer.embed(“audioplayer_11”, {soundFile: “http://snugsound.com/blog/fruity-candy-2/11%20Swing%20+%20rev.mp3”, noinfo: “yes”});

Swing

As you can probably hear in the above I added some swing using FL Studio’s “Master swing” control. Note that this only applies swing to the step sequencer, however, so if you want to add swing/groove to the piano roll you’ll need to use the Piano Roll Quantizer.

Just for fun

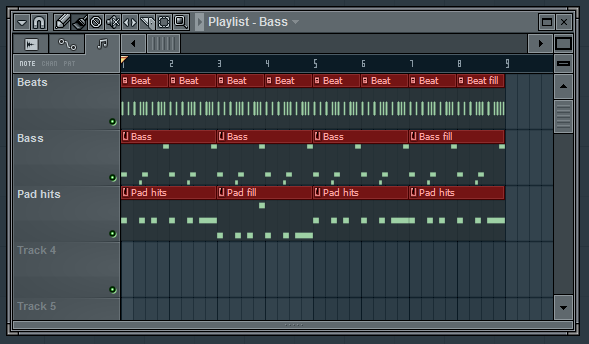
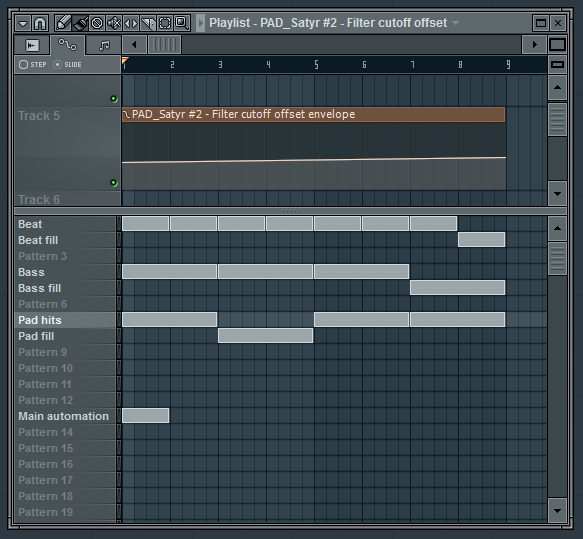
Okay so I’ve added a bit of bass stuff for fun and put it all together:

Get Flash

AudioPlayer.embed(“audioplayer_12”, {soundFile: “http://snugsound.com/blog/fruity-candy-2/12%20With%20bass.mp3”, noinfo: “yes”});

It’s… some kind of dubstep… eh?

What’s next?

Download the FL Studio project and poke around. You’ll see I’ve used EQs and limiters in places to do a rough mixdown. That’s outside of the scope of this particular article, but I would encourage you to read up on using compressors and equalizers to mix your tracks.

Until next time…

Update – Jan 17
I received the following feedback from a user on the Image Line forums, which I will try to integrate shortly:

…when using two different kick samples, they may also have differing fundamental pitches.

When two kick drums with different fundamentals sound at the same time, you will either get some rather tasteless distortion or they will sound very disconnected (depending on how much is cut or shared between them) and it is very apparent on a PA and high-end consumer equipment.

So use a FFT or similarly functional spectrum analyzer on your kick samples to find their fundamental pitches and correct them to sound at the same pitch class

It also doesn’t hurt to do the same thing for the snares, but sometimes the distortion is wanted there so it’s up to taste.

Fruity Candy episode 1: the power of patterns

Welcome to the first (but hopefully not the last) instalment of Fruity Candy – a tutorial series on FL Studio.

Preface

I’ll start by sharing my motivation behind doing this: FL Studio has become such an integral part of my music making process, and in the process of using it for 8+ years I’ve gotten to know it inside and out. I’d like to share some of this acquired knowledge with the online community in the hopes that it will save somebody a bit of time, help them develop a more efficient workflow, inspire them, whatever.

What is a pattern?

I think part of the reason FL Studio has become so key to my process is because of its support for patterns. I started off writing music with computers around the time of trackers – Scream Tracker, Impulse Tracker, etc. These early music creation tools were all about patterns, actually, so much so that you had to enter note and automation data manually, step by step.


After using them for several years I made the switch to FL Studio, and while there was a bit of a learning curve with regards to how automation worked, the pattern-based approach was pretty much exactly what I was used to, but with lots of welcomed additions (virtual instruments, effects, piano roll!)

If you’ve used FL Studio, a tracker, or even a drum machine before, you probably have a pretty good idea of what a pattern is. In the context of music making it’s basically a series of data (typically note or automation data) that can be looped, or in this case, used a building block to create something bigger.

So why should you care about patterns? In a word: time.

A practical example

The biggest thing I’ve found with patterns is that they save a huge amount of time. Let’s say you’ve got a 1 bar loop that you want to repeat for 4 bars. In FL Studio you would simply program the beat once and “draw” the pattern 4 times on your pattern playlist.


With a conventional sequencer you would have to copy/paste this 1 bar loop 4 times. Each copy/paste would result in a new unique copy of that loop. If you decided you want to add an extra ghost snare to your beat you’d need to go into each copy and add it manually.

N.B.: some sequencers do offer a concept similar to patterns:

  • In Cubase you can create “shared” copies by holding ALT + SHIFT and dragging a part
  • In Ableton Live: if you “stretch” a clip in arrangement view it will automatically loop, however, if you cut the clip to insert a fill/variation you will end up with two unique non-shared clips. Blast!

Where patterns really shine is as you start to lay out your main sequence. To expand on the above example, in addition to your beat you may also have a bass line and some pad hits that you want to repeat. Easy: make 3 patterns and draw them on the playlist the desired number of times.


That’s good and all, but pretty boring. It needs some variation. Let’s create a copy of each pattern that does something a bit different – some filter automation on the bass, a fill on the beat and a variation for the pad hits At this point you need to make a decision about how you want to lay things out: as pattern clips or pattern blocks.

Pattern clips vs. pattern clips

Personally I’m a creature of habit and have gotten used to laying things out with pattern blocks (pattern clips didn’t exist in earlier versions of FL Studio). With this approach it’s very important that you keep related patterns together or you will end up with a nightmarish playlist. It also helps to name them well, colour them, etc. so you can remember what they are:


The main drawback with the pattern block playlist is that each row is tied to a specific pattern, as you can see above. Pattern clips, on the other hand, can be placed anywhere within the clip arrangement, often resulting in a much cleaner layout. Here’s the same thing laid out with clips:

The important thing to note here is that a pattern clip and a pattern block are the exact same thing. They reference the same pattern, it’s just a matter of how you choose to lay them out. There’s no reason you can’t use both together and I often do. For example, I will put my automation clips up top as this gives me the ability to edit the automation directly from the playlist:


In closing

I hope this article has shed a bit of light on patterns in FL Studio and how to use them. Here’s a zipped loop package (FL Studio 9) that shows these concepts in action. For illustrative purposes I’ve laid out the same thing both as pattern blocks and pattern clips.

Till next time…

Exporting seamless loops from FL Studio

FL Studio is half-decent at exporting seamless loops when you’ve got the render mode set to “Wrap”. I say half-decent because while it will account for delay or reverb tails, it seems to have trouble with the release phase of instruments (audio)

Here’s a pretty straight-forward technique I’ve come up with to get around this. (In my case I’m using an older version of Sound Forge but any decent audio editor should do)

Step 1. Export what you want to loop, plus a tail of the same length (audio):


Step 2. Load the file in your editor

Step 3. Select the second half of the wave. In Sound Forge I do this like so:

A. Double-click the loop point that FL added to the wave:


B. Set the “Input format” to “Measures & Beats”:


C. Change the selection from 16 to 8 and click OK:


D. Double-click the second half of the wave


Step 4. Cut the selection

Step 5. Paste the clipboard at the start of the wave in “mix” mode:


Et voila!

How to make NES music

I like video games, music and synthesizers. Nothing brings these three things together quite like the soundtrack from a NES game. Sure, there’s the C64’s SID chip, but alas, I never owned a C64 (side note: check out Quadrasid and Sidstation).

So then, you say you want to write some original NES music? There are some good resources on the web (here’s a starting point), but I wanted to summarize the two main approaches and my experiences.

Use synthesizers

There are a couple important things to keep in mind when using modern synthesizers to write NES music:

  • The NES had 5 channels:
    • 1 triangle
    • 2 pulse (with only 4 duty cycles to choose from)
    • 1 noise
    • 1 D-PCM
  • The NES had no effects or filters, although basic chorus and echo effects could be achieved by using two channels

The triangle and pulse channels are easy enough to simulate, but the noise and D-PCM take a bit more work. My earlier attempts at writing NES music were done mostly with my workhorse subtractive synth, NI Pro53. I also played around with Waldorf Attack to simulate the noise channel, and Bitcrusher to simulate the D-PCM channel, with varying degrees of success.

I recently came across the NES VST pack. It consists of 3 plug-ins: pulse, triangle and noise. The pulse plug-in has a switch to toggle between the 4 duty cycles. The noise plug-in has 2 noise modes and allows you to “sweep” the noise. All 3 plug-ins are quite faithful to the original NES sound chip.


Here’s a little demo I whipped together with nothing but the NES VST pack and the default FL Studio limiter. Update Sept. 09: by popular demand here’s the FL project (you’ll need FL Studio 8 to open it)

Use the actual hardware (or emulation)

If you’ve got a bit of money to spend, Wayfar makes something called the MIDINES. It’s basically modified NES cartridge that runs custom software and provides a MIDI interface to the actual NES sound chip! Check out the demos!

Otherwise, take a look at trackers like Famitracker or Nerdtracker ii. These allow you to create NSF (NES sound format) files which can then be played back with an NSF player. If you’re not familiar with trackers then these will be a bit awkward to use at first, but next to the MIDINES they will give you the most convincing results.