

Watch your head bro! Generally speaking you want to maintain 3-6 dB of headroom when you’re working on a track. This means the master should peak somewhere between -6 and -3 dB. Why? Well in short: the closer you get to 0 dB the easier it becomes to inadvertently cause clipping. And unlike analog clipping, which can be warm and musical, digital clipping sounds bad. Very bad, bro.
First thing’s first: if we’re going to be watching our levels we’ll need a little more insight. Live’s mixer offers some useful information that, by default, is hidden (although they’ve changed this in Live 9)

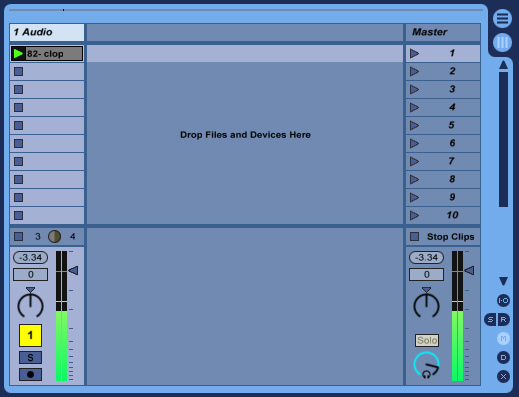
Increase the height of the mixer section to reveal two values: the value in the pill-shaped box is the peak level; the value in the rectangle is the fader level.
Scaling your levels
In the following example I have a single audio loop playing. As you can see, with just this one loop I’m already hitting -3.34 dB.
If I add anything else I’m likely going to cause some clipping:

Woops! I do like the mix between these two audio clips so rather than adjust the faders individually I’m going to bring them both down in one go. With the track still playing:
- Click on the track title for any of the tracks (in this case, “1 Audio”)
- Press CTRL+A to select all other tracks
- Adjust any of the faders – the faders for all other tracks will move by an equal amount
- Click on the master “Peak level” reading to reset it
- Rinse and repeat until you reach an ideal headroom

As you can see, by scaling my levels every time I add something to my track it’s easy to maintain a consistent 3-6 dB of headroom even before the track is completed.
Volume automation
A common problem with volume automations is that, traditionally, you’re forced to wait until you’ve fully mixed your track before adding them. Why? Because they work on an “absolute” basis and not a “relative” basis. That is, an automation from -8 to -5 dB will always do just that — even if you move the fader in an attempt to adjust your levels it will jump back to the automation levels as soon as you click “Back to Arrangement”.
There’s a very easy way to get around this in Live, though: instead of automating the mixer level, insert Live’s “Utility” device in your chain and automate the “Gain” knob:
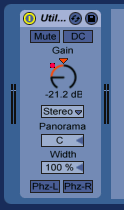
Now your volume automation will work relative to the mixer, so in the example above it would be a “3 dB boost” instead of a “sweep from -8 dB to -5 dB”!
In Closing…
Some might say it’s best to not worry too much about headroom while writing, and to do a full mix-down at the very end (that is, bring all the faders down and mix from scratch). While I won’t argue with this approach, my philosophy on this differs. Obviously you don’t want to get side-tracked mixing your track before it’s written, but if you’re cognizant of your headroom while you’re writing it will be that much easier to mix in the end.