Novation UltraNova – back with a bang

Still on the topic of synths, I just came across this: 
Following in the footsteps of the classic Nova synths of
yesteryear, but at a fraction of the price and with way more features (with
some exceptions, see below) – vocoder, two filters (14 types), tons of mod
options, wavetable synthesis, 4 outputs on the integrated audio interface, etc.
People seem to be hating on it because it’s not
multi-timbral and the polyphony is rather low (18 voices), but this is of no
importance to me as I would be using it primarily for live performance. Though only thing I’m unsure about is how I feel about using endless rotaries for live tweaking. Will have to give it a try.
Once it becomes readily available I may just have to swap
my X-Station for one of these 😉

Buying an analog synth (or, my new toy!)

I was recently in the market for a new synth, primarily for live use. At first I was considering the Roland GAIA SH-01 because of it’s price point, tweakability and features (decent on-board FX, tap tempo delay, 3 filters, etc.). But then I got to thinking… I already own a decent digital synth (Novation X-Station), I use a laptop as part of my live setup and have access to all sorts of digital VSTs, etc.

I decided it was time to go in a completely different direction. Time to go back to the basics. ANALOG.

Criteria:

I knew roughly what I wanted:

  • 2 oscillators
  • Glide (must-have for leads) 
  • Real-time tweakability
  • Budget: ~$1000

 Vintage:

At first I considered vintage analog synths, but obviously there are several caveats with this:

  • Often overpriced. For example, the Roland SH-101, a basic monophonic synth can sell for $1000+
  • Stability/reliability: older synths aren’t necessarily reliable, may not have automatic stabilization of the oscillators, etc.

Here are a few I did consider though:

  • Yamaha CS-10
    • Pros: relatively cheap
    • Cons: only 1 oscillator, no patch memory
  • Roland SH-101:
    • Pros: can be converted to a key-tar (!), classic synth with a great sound
    • Cons: overpriced, no patch memory
  • Juno 6:
    • Pros: polyphonic
    • Cons: huge, no patch memory, voice chips are known to fail

New:

I then switched my focus to new gear. One of the obvious benefits of new analog synths is that they have modern conveniences like MIDI, patch memory, etc. Not absolute must-haves for me but definitely nice-to-haves.

  • DSI MoPho keyboard:
    • Pros: patch memory, keyboard
    • Cons: “paging” of the controls
  • Moog Little Phatty:
    • Pros: patch memory, keyboard, Moog sound!
    • Cons: only 4 knobs, no noise generator
  • Future Retro XS
    • Pros: tons of synthesis options, semi-modular
    • Cons: no keyboard, no patch memory
  • Doepfer Dark Energy
    • Pros: good price, small size, semi-modular
    • Cons: no patch memory, no keyboard, only 1 oscillator, glide option extra, no noise
  • MFB Kraftzwerg
    • Pros: good price, semi-modular, 3 osc
    • Cons: no glide, no patch memory, no keyboard

The decision:

After careful deliberation I finally arrived at a winner:

The Moog Little Phatty

Although it has its limitations (no noise generator, only four knobs), they can easily be overcome:

  • I can use an external noise source (Moogerfooger CP-251, my X-Station, etc.) and route it through the external input.
  • The 4 knobs can be remapped to anything, internal or external. So between these, the mod wheel, and the filter CV input (i.e. for expression pedal), that should be plenty of real-time control. Further, all of the parameters on the synth respond to MIDI so they can easily be tweaked from a controller.
  • Although the Moog does page the controls, like the MoPho, it has LEDs around the knobs which is great for recalling presets. And with the “latch” mode there are no concerns about parameters suddenly jumping to a new value. Very cool.

The last time I owned an analog synth was when I as a teenager. It was my first synth actually, an Akai AX-60. Lots of fun, although not quite as punchy or warm as other vintage analogs. I’m stoked to own a new one, and a Moog no less!

Ten reasons why VVVVVV is a whole world of awesomeness

  1. The name gives you a clue as to what you’re up against.
  2. It’s 100% pure unadulterated platforming bliss. If you played platform games as a kid, you will love it.
  3. It’s $5 on Steam
  4. Simple but cool concept, expanded upon masterfully.
  5. The graphics are horrendous but you don’t even notice.
  6. Great level design. Nothing is overdone, nothing gets
    old. You will be swearing, laughing, and have a general awesome time.
  7. I died 800+ times in a play-through of the game but
    didn’t care. Why? There is no lag time from the time you die to the time you restart.
  8. Every single room has a name.
  9. The protagonist and all of his friends have shit-eating
    grins for the majority of the game.
  10. The sound track! Oh my… the soundtrack! (buy it here – I just did)

 I will leave you with my favourite track from the soundtrack:

Roland GAIA SH-01 first impressions

I had the opportunity to play around with this synth at a
local music shop and I have to say I was quite impressed
Quality:
Everything about this keyboard felt good to me. The
construction felt sturdy, the keys felt good, the knobs and sliders were well
spaced and quite tweakable, etc. No real gripes in this department.
Features:
Pretty much everything you’d expect from a modern VA
here: 3 oscillators with 21 waveforms (7 x 3 variations), 64 voices, arp with
64 patterns. (Full specs here)
Some of the specific features I’m really digging:
  • tap tempo delay (quite handy for live performance)
  • separate filters for each oscillator: LPF, HPF, BPF,
    PKG (-12 dB/-24 dB)
  • the ability to edit multiple oscillator settings at
    once (i.e. sweep the aforementioned separate filters together!)
Another nice touch is the ability to save your patches to
a USB flash drive, although I can’t see this being the kind of synth where
you’d have that many patches! (The on-board memory allows for 8 banks x 8
patches per bank).
Lastly, the effects section offers 5 separate stages, each
of which allows you to choose an effect:
  • DIST: Distortion, Fuzz, Bit Crash
  • FLANGER: Flanger, Phaser, Pitch Shifter
  • DELAY: Delay, Panning Delay (with tempo sync function)
  • REVERB: Reverb
  • LOW BOOST: Low Boost

Expressiveness/sounds:
A good variety of waveforms here: sawtooth, supersaw,
square, triangle, sine, noise and pulse, each with 3 “variations”
(from what I understand, the variation button adjusts the harmonics of the
waveform).
Really, my only gripe in the sound department is the
filters – they didn’t sound bad per se but they did sound very digital and
extremely resonant. This did make for some pretty wild sounds when coupled with
the on-board distortion and fuzz effects though.
Ease of use:
Everything I tried to do was dead simple, which I think is what Roland was going for. There is no menu diving needed to do anything.
The most complicated thing here is the “SHIFT” button, which allows
you to access some (slightly) hidden features that you may need to consult the
manual for. For example, setting up modulation, oscillator panning, controlling
some of the FX parameters, etc. Once you know how to use it you’re set though.
Overall impression:
I quite enjoyed my time with the SH-01. I don’t think it
breaks any new ground but what it does do it does well, and I think it would make
a great (cheap) alternative to more expensive VAs.
Pros:
  • Very easy to program and tweak
  • Separate filters for each oscillator
  • Lots of on-board effects, including tap-tempo delay
  • Great price ($699)
Cons:
  • No LCD means no patch naming (oh well!)
  • Not multi-timbral

Blazing through the techmosphere (new drum & bass mix)

A smooth blend of melodic, atmospheric and techmospheric drum & bass and drumstep.

Blazing through the techmosphere – September 2010 by Snug

Tracklisting:
01 ASC – Focus Inwards
02 Blue Motion – Leaving Home
03 ASC – Stardust
04 Blu Mar Ten – Overwhelm (Seba remix)
05 Jubei – Outcast
06 Mav – Ocean Phantom
07 KM & Paralyzah – Nega
08 Kharm – Hiding Place
09 Modemellow – Plasma Surface
10 Mendalayev & Cutworks – Across the Space
11 Kubiks & Lomax – Get it on
12 LM1 & Kharm – Duplicity
13 Seba – Arsenic
14 Snug – Starstruck

Website and blog changes

As you can see I’ve merged the contents of my main website with the blog and also added some nifty bits like the label cloud and Twitter feed.

There may be a few more interruptions as I decide what I want to do with the main snugsound.com domain. For now it’s just a redirect to the blog subdomain. If I switch it over to BlogSpot then I would lose the ability to host stuff at snugsound.com and it would break a bunch of links. Hmm…

Also, as much as it pains me to say this, I’ve forsaken the “Wave of the future” name! Sadly, it just doesn’t make sense now after the merge 🙁

Fruity Candy episode 1: the power of patterns

Welcome to the first (but hopefully not the last) instalment of Fruity Candy – a tutorial series on FL Studio.

Preface

I’ll start by sharing my motivation behind doing this: FL Studio has become such an integral part of my music making process, and in the process of using it for 8+ years I’ve gotten to know it inside and out. I’d like to share some of this acquired knowledge with the online community in the hopes that it will save somebody a bit of time, help them develop a more efficient workflow, inspire them, whatever.

What is a pattern?

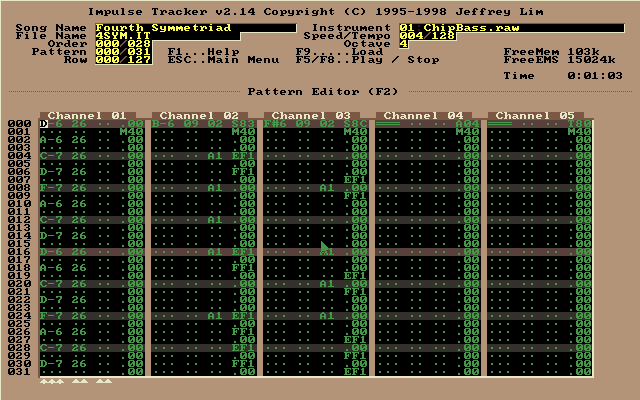
I think part of the reason FL Studio has become so key to my process is because of its support for patterns. I started off writing music with computers around the time of trackers – Scream Tracker, Impulse Tracker, etc. These early music creation tools were all about patterns, actually, so much so that you had to enter note and automation data manually, step by step.


After using them for several years I made the switch to FL Studio, and while there was a bit of a learning curve with regards to how automation worked, the pattern-based approach was pretty much exactly what I was used to, but with lots of welcomed additions (virtual instruments, effects, piano roll!)

If you’ve used FL Studio, a tracker, or even a drum machine before, you probably have a pretty good idea of what a pattern is. In the context of music making it’s basically a series of data (typically note or automation data) that can be looped, or in this case, used a building block to create something bigger.

So why should you care about patterns? In a word: time.

A practical example

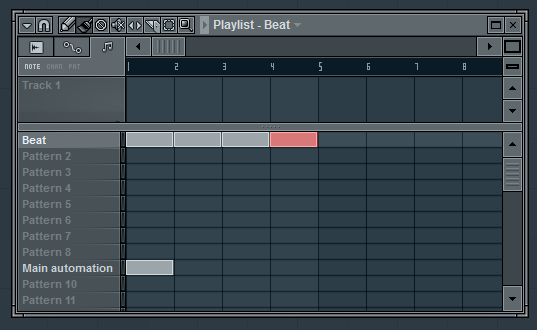
The biggest thing I’ve found with patterns is that they save a huge amount of time. Let’s say you’ve got a 1 bar loop that you want to repeat for 4 bars. In FL Studio you would simply program the beat once and “draw” the pattern 4 times on your pattern playlist.


With a conventional sequencer you would have to copy/paste this 1 bar loop 4 times. Each copy/paste would result in a new unique copy of that loop. If you decided you want to add an extra ghost snare to your beat you’d need to go into each copy and add it manually.

N.B.: some sequencers do offer a concept similar to patterns:

  • In Cubase you can create “shared” copies by holding ALT + SHIFT and dragging a part
  • In Ableton Live: if you “stretch” a clip in arrangement view it will automatically loop, however, if you cut the clip to insert a fill/variation you will end up with two unique non-shared clips. Blast!

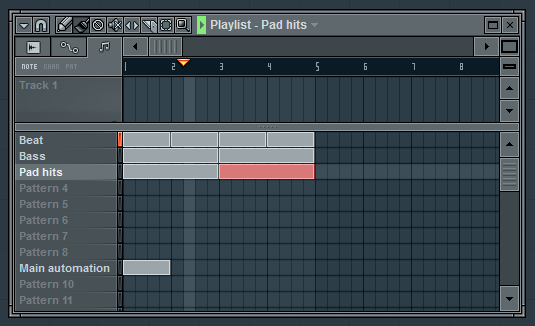
Where patterns really shine is as you start to lay out your main sequence. To expand on the above example, in addition to your beat you may also have a bass line and some pad hits that you want to repeat. Easy: make 3 patterns and draw them on the playlist the desired number of times.


That’s good and all, but pretty boring. It needs some variation. Let’s create a copy of each pattern that does something a bit different – some filter automation on the bass, a fill on the beat and a variation for the pad hits At this point you need to make a decision about how you want to lay things out: as pattern clips or pattern blocks.

Pattern clips vs. pattern clips

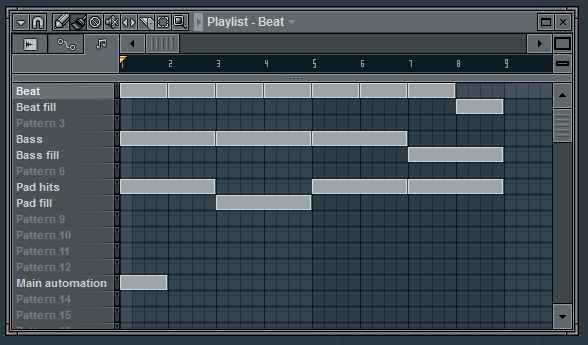
Personally I’m a creature of habit and have gotten used to laying things out with pattern blocks (pattern clips didn’t exist in earlier versions of FL Studio). With this approach it’s very important that you keep related patterns together or you will end up with a nightmarish playlist. It also helps to name them well, colour them, etc. so you can remember what they are:


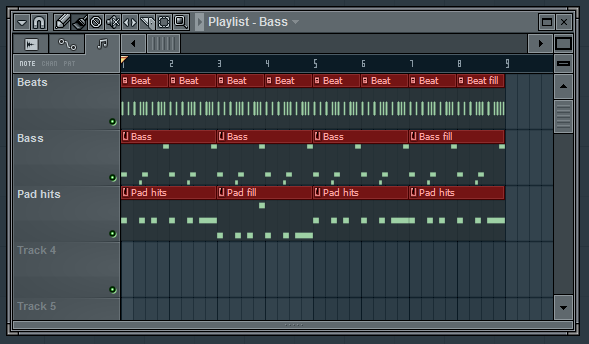
The main drawback with the pattern block playlist is that each row is tied to a specific pattern, as you can see above. Pattern clips, on the other hand, can be placed anywhere within the clip arrangement, often resulting in a much cleaner layout. Here’s the same thing laid out with clips:

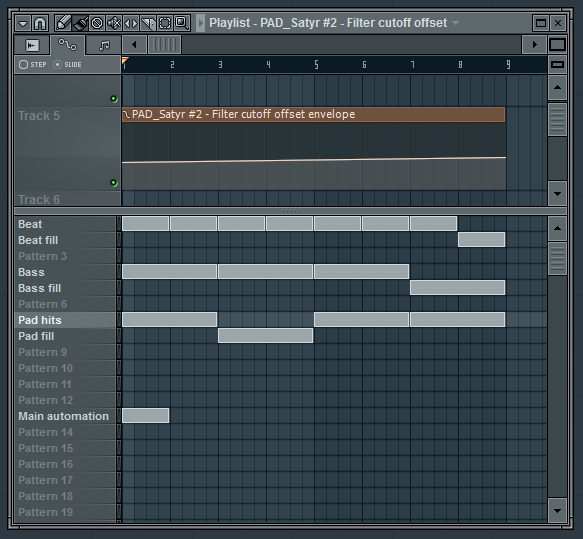
The important thing to note here is that a pattern clip and a pattern block are the exact same thing. They reference the same pattern, it’s just a matter of how you choose to lay them out. There’s no reason you can’t use both together and I often do. For example, I will put my automation clips up top as this gives me the ability to edit the automation directly from the playlist:


In closing

I hope this article has shed a bit of light on patterns in FL Studio and how to use them. Here’s a zipped loop package (FL Studio 9) that shows these concepts in action. For illustrative purposes I’ve laid out the same thing both as pattern blocks and pattern clips.

Till next time…