My musication

Some people take a vacation. Others take a staycation. Well, next month I’m taking a musication.

WTF is a musication, you ask? It means leaving behind the distractions of everyday life and hunkering down to really focus on music.

The impetus? At the core it’s the 5 day work week. By the time I’ve worked 8+ hours, gone grocery shopping, made dinner and gone for a run I have roughly 5% of my daily energy left — approximately enough to take a shower and plunk myself in front of a TV or video game

I am most motivated in the mornings which means that, at most, there are only 2 days a week where I can work on music at “full capacity”. That’s two days if I’m lucky. Between the inherent distractions of having a studio at home and the million obligations that come with being a “grown-up” (marriage, home ownership, car ownership, pet ownership!), music often loses out.

In the past, herbal therapy helped me tune everything else out, but this introduced a whole new level of complexity into the equation, i.e. it became a crutch for working on music, and often my grown-up responsibilities fell by the wayside.

So next month I’m packing up my studio and heading to a cottage for 5 days x 8 hours a day = 40 hours. That’s a full “workweek” to apply all of my motivation to music!

Should be an interesting experiment and I will post updates as the week progresses.

Disk speed and multi-tracking

A friend recently asked me about disk speed as it pertains to multi-tracking:

“I’m getting in a new laptop next week, and have a bit of extra cash to
spend as well. It comes with a 1TB 5400 RPM drive. Would it be worth
it, performance wise, to splash out on a 7200 or 10000 RPM drive and use
the 1TB as extra storage? In terms of multi tracking and sequencing,
would there be a noticeable difference between using the 5400 as a main
drive and using a faster one?”

I figured I would share my response here, as it may help others facing the same decision:

“It really depends how many tracks you’re tracking at once. If
you’re doing a couple at a time then it probably won’t make much of a
difference for recording, but if you’re doing like 8 or something then
you definitely want the fastest drive possible.

The other thing to
consider is how many tracks you’ll be playing back. The default
behaviour of most DAWs is to stream from disk, and of course the more
tracks you stream the more likely you are to hit the limitations of disk
I/O. If your DAW supports loading audio to RAM (Ableton Live does, for
example), then you can ignore this bit.

One trick to get better
(not necessarily faster, but more consistent) disk performance would be
to partition the disk and dedicate one partition solely for recording
and/or as a scratch disk (if your DAW supports it). This way you don’t
need to worry as much about fragmentation, since they will “fragment”
separately.

Finally, if you’re running Windows 7 you could get a large USB thumb drive and use it for ReadyBoost, which basically gives you solid-state caching of frequently
accessed files (system files and the like). This way the DAW can get more
“exclusivity” of the mechanical drive.”

Hope this helps somebody out there! If you’re wondering about my setup: I have a mechanical drive and a solid-state drive. I use the SSD for ReadyBoost and as a scratch drive (for Ableton and Photoshop). Plus I have a 16GB thumb drive that I use for ReadyBoost as well, when USB bandwidth permits.

Managing headroom in Ableton Live

Watch your head bro! Generally speaking you want to maintain 3-6 dB of headroom when you’re working on a track. This means the master should peak somewhere between -6 and -3 dB. Why? Well in short: the closer you get to 0 dB the easier it becomes to inadvertently cause clipping. And unlike analog clipping, which can be warm and musical, digital clipping sounds bad. Very bad, bro.

First thing’s first: if we’re going to be watching our levels we’ll need a little more insight. Live’s mixer offers some useful information that, by default, is hidden (although they’ve changed this in Live 9)

Increase the height of the mixer section to reveal two values: the value in the pill-shaped box is the peak level; the value in the rectangle is the fader level.

Scaling your levels

In the following example I have a single audio loop playing. As you can see, with just this one loop I’m already hitting -3.34 dB.

If I add anything else I’m likely going to cause some clipping:

Woops! I do like the mix between these two audio clips so rather than adjust the faders individually I’m going to bring them both down in one go. With the track still playing:

  1. Click on the track title for any of the tracks (in this case, “1 Audio”)
  2. Press CTRL+A to select all other tracks
  3. Adjust any of the faders – the faders for all other tracks will move by an equal amount
  4. Click on the master “Peak level” reading to reset it
  5. Rinse and repeat until you reach an ideal headroom

As you can see, by scaling my levels every time I add something to my track it’s easy to maintain a consistent 3-6 dB of headroom even before the track is completed.

Volume automation

A common problem with volume automations is that, traditionally, you’re forced to wait until you’ve fully mixed your track before adding them. Why? Because they work on an “absolute” basis and not a “relative” basis. That is, an automation from -8 to -5 dB will always do just that — even if you move the fader in an attempt to adjust your levels it will jump back to the automation levels as soon as you click “Back to Arrangement”.

There’s a very easy way to get around this in Live, though: instead of automating the mixer level, insert Live’s “Utility” device in your chain and automate the “Gain” knob:

Now your volume automation will work relative to the mixer, so in the example above it would be a “3 dB boost” instead of a “sweep from -8 dB to -5 dB”!

In Closing…

Some might say it’s best to not worry too much about headroom while writing, and to do a full mix-down at the very end (that is, bring all the faders down and mix from scratch). While I won’t argue with this approach, my philosophy on this differs. Obviously you don’t want to get side-tracked mixing your track before it’s written, but if you’re cognizant of your headroom while you’re writing it will be that much easier to mix in the end.

December mini-tour

Just a quick note to let ya’ll know that I’ll be making the trek from Halifax to Ottawa in December, stopping in Fredericton along the way:

I’m especially stoked on the Soulselecta show. For those who don’t know, Soulsecta was an “anything goes” (musically speaking) night that ran at Brixton’s for years. After a bit a hiatus they’re back again at their new home. This will be the second one since they’ve started back up, and I’m honoured to be a part of it (also really excited to see this “Mugshots” place)

New track: Minus World – Summer Wars (Snug remix)

I recently remixed “Summer Wars” by Halifax-based band Minus World to support the release of their EP. Keep an eye on their BandCamp as it will soon be available for download. In the meantime here’s a streaming version on SoundCloud:

Minus World – Summer Wars (Snug’s dub wars remix) by Snug

And if you’re into this dubby sort of vibe also check out my bootleg mashup of Saafi Brother’s Welness Farm and Together in Silence: Silence Farm

Extra Life 2012: Play Games, Heal Kids

Well, it’s that time of year again! In case you aren’t familiar with the concept, I basically sit on my ass and play video games for an extended period of time.

How is this different than any other day you ask? Well, firstly, I will be playing for slightly longer than usual – 24 hours. Secondly, I’m doing it to raise money for the Children’s Miracle Network and the IWK Foundation.

If the prospect of my eyes bleeding and brain exploding from 24 hours of video games isn’t enough to motivate you, surely helping children is?

Head on over to my Extra Life page or click the link below to pledge!


Thanks for your support!

P.S. remember: the opposite of “Play Games, Heal Kids” is “Don’t play games, hurt kids”. You aren’t in support of hurting children… are you?!

Music Technology Program

For those looking to get into computer-based music but not sure where to start, I have put together a 6 week program in music technology (based in Halifax, starting in October). Really excited to share some of the things that I’ve learned over the years and hopefully get other people as interested in this stuff as I am 🙂

More information/registration: http://learning.snugsound.com/

Review: Numark NS6

Preface

So after a couple years of DJing with Ableton Live using my Allen & Heath Xone:2D I’ve decided I don’t like it. It’s not fun.

Don’t get me wrong, I love Ableton Live, but as a DJ platform it’s clunky. Sure there are some definite pros to DJing with Live but personally I feel the cons outweigh them.

So based on the above, plus a decent tax return, I decided to pick up the Numark NS6.

Numark NS6

First impressions

My decision was really down to the Traktor Kontrol S4 or NS6. I didn’t get a chance to play with the S4 first hand but I was able to compare an S2 and the NS6 side by side.

Coming from a vinyl background the NS6 felt much more natural to me, probably in large part due to the long pitch faders and bigger platter. Setting cue points was extremely intuitive – more so than the S2 – and I was able to start mixing immediately without so much as a glance at the manual.

In-depth

Hardware

The NS6 has all the outputs you’d expect: two main outputs (RCA and XLR) and a booth output (RCA only). The mixer layout is fairly compact which may throw some people off, but the knobs and faders feel sturdy.

One nice addition is that you can also use the NS6 as a conventional mixer: the two main channels offer switchable line/phono inputs while the other two offer switchable line/mic inputs. Realistically I’m not sure how practical this would be in a club setting as more than likely you would be plugging the NS6 into the house mixer alongside any turntables or CDJs, but it’s still a nice addition nonetheless.

I do have a gripe with the placement of the ground connection, however. It’s at the far end of the inputs rather than being in between the two phono inputs. Depending on your cabling this could be quite a nuisance (it was for me, anyway).

NS6 rear view

Where the NS6 really excels is with its large high-resolution platters, long pitch faders and “strip search” (track scan) ribbons. For me these three things combined rivalled playing on vinyl.

Software

I have to admit I had never actually used Serato before though I had seen it so I knew what to expect. The layout is fairly intuitive so it didn’t take me long to get used to it.

Most of the gripes I have with the NS6 are with the ITCH software, and not with the controller itself. For example, the key lock (“Master tempo”) algorithm is very glitchy – it’s more akin to Live’s “beat” warp mode than something as smooth as Complex or Complex Pro. From what I’ve read, Serato Scratch has far superior key lock but ITCH is always a few feature cycles behind.

The FX are also lacklustre. The HP and LP filters are fine but, for example, the reverb is horrendous to the point where it’s not usable. Some of the other FX also felt a bit too gimmicky for me.

One thing I was pleasantly surprised with, and which seems to be a feature specific to the NS6/ITCH combo, is the “bleep” reverse mode. Basically, it does a momentary reverse of the track without throwing off the playback location. This allows for some very interesting mixing possibilities, and it’s something I have to restrain myself from going overboard with because it’s just so much fun! There is a caveat with this feature, however: it’s accessed by pressing the shift button followed by the reverse button. If you forget to press the shift button first the playback will go into full-on reverse mode. It’s unfortunate they didn’t do this the other way around, as accidentally putting a track into reverse mode is not something you can easily recover from when you have another track mixed in.
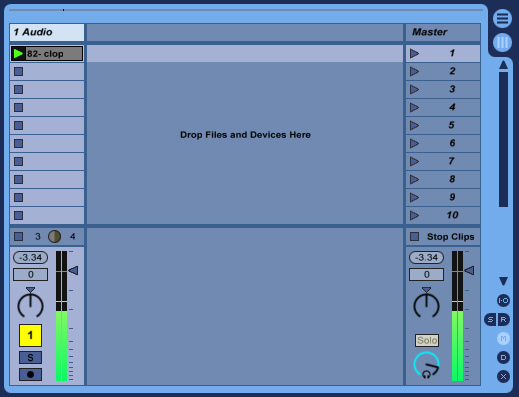
Serato ITCH

Integration

The integration with Serato ITCH is extremely tight. Once you’ve got music loaded into your library you won’t need to touch your laptop. At all. Navigating your library is a breeze and you can even do some limited searching using the buttons on the NS6.

While I occasionally had issues with my Xone:2D registering itself with Windows 7, the NS6 connectivity has been flawless. I’ve never had to mess around with different USB ports, reboots, or anything else.

NS6 with ITCH

Summary

The good:

  • good build quality
  • high resolution jog wheels (“the best on the planet”)
  • long pitch faders

The bad:

  • software lacking in several areas (keylock, FX)
  • short faders may turn some people off
  • some questionable design decisions, such as placement of ground connections

Overall I would highly recommend the NS6. Whether you are just getting into digital DJing, or a seasoned veteran, I think you will be pleasantly surprised. While some of the issues with the software do put me off a bit I have my fingers crossed that they will be resolved with time.